Easy Fall & Halloween Disney Crafts
- Tara Simone

- Sep 22, 2021
- 6 min read
Updated: Oct 19, 2021

Get ready to get a little spooky! These easy DIY Disney Fall and Halloween Crafts are some of my favorite to do on a cold, cozy autumn afternoon.
My goal with any project is to keep it easy, cheap, and FUN. Scroll down to learn how to make Dollar Tree Mickey Pumpkins, quick and spooky bats, and my favorite this year - Mickey & Minnie Ghost!! I also included some crafts that have been saved to my Pinterest from other bloggers for you to try.
PLEASE tag me over on Instagram or Pinterest (@tarasimone_fit) so I can see your Mickey Crafts!
*this blog may contain affiliate links that provide me a small commission at no additional cost to you! Thank for you supporting my small business in this way. Don't forget to like, comment, and share.

Mickey Pumpkin Sign 🎃 another quick and easy Dollar Tree Craft! All you need is one larger wood pumpkin, two smaller wood pumpkins for ears, orange paint, black sharpie or paint, hot glue, and a chopstick or dowel.
To start, paint your wood pumpkins orange. Once dry hot glue the smaller pumpkins aka the ears to the larger pumpkin on either side of the stem.
Now, hot glue the dowel or chopstick to the back leaving a few inches sticking out the bottom so you can stick in into the ground (or add rope to the top to hang it.)
Lastly, draw a Mickey Face on the pumpkin! 💛

DIY Mickey Pumpkin 🎃This 5 minute $2 craft is so cute and one of my favorites! 🧡all you need is foam pumpkins, hot glue, & a little paint if you’d like to change the color!
Simply buy two different size pumpkins from Dollar Tree. Smaller ones sometimes come on toothpicks & usually come in packs of 6, 8, or 10.
Next paint the pumpkins if you want a different color and allow to dry. I added little speckles to mine for fun!
Now take the smaller pumpkins aka the ears and cut the toothpicks about an inch from the pumpkin.
Next, add a little hot glue around the toothpick for extra hold.
Lastly, stab the small pumpkin toothpicks ears on either side of the stem. 🍁💛

My FAVORITE DIY this fall and a slightly more complicated one! The full reel on Instagram will be super helpful to watch for this craft.
👻Supplies:
Light up paper lantern
Shower liner
Cricut & black vinyl
Thin wire
Plastic lids (circular)
Black spray paint
👻How to:
✂️Cut your shower liner in half, fold it once, and place over lantern. Secure together with thin wire at the top by piercing it through the liner and around the hanging wire of the lantern.
✂️Go to Cricut Design Space and print out a Mickey & Minnie face on Permanent Black Vinyl. (I created my faces by downloading a picture off google, removing the background, and uploading to design space.) Place face on middle of lantern
*alternative if you don’t have a Cricut* draw or paint a Mickey face on to your shower curtain. You can easily see through the liner so it is possible to trace a perfect face from a picture of your laptop.
✂️Create the ears by spray painting round plastic lids, cutting off the edge *carefully*, and piercing thin wire through twice on the top & bottom for stability. You can spray paint again to hide the wire if you’d like.
✂️Once dry, stab the wire of the ears through the liner and lantern. Twist the wire to secure.

This DIY is so easy I don't even think you need instructions! But I will share them anyways for these cut little bats!
Simply, buy black card stock and cut or use your Cricut to make different sized bats.
(the ones I made are not Disney inspired, but you could easily cut out mouse ears to make them Mickey Bats!)
Once cut out, add a slight bend to the wings for a 3D look and then tape to the wall.
That's it! This craft only takes a few minutes and would be perfect to do with your kids.

How cute is this Mickey Wreath?! My friend over at Big Bears Wife Blog shared this gorgeous craft on Pinterest!
All you need is some foam pumpkins, a fall wreath, wire, and hot glue. She makes this craft look so easy and I know you are going to love it!
You can find the full how to on her blog linked below.

Cozy and spooky DIY coming your way! This Mickey Ghost pillow is the perfect accent for any living or bedroom and much cheaper than the ones found in the parks!
My friend over at Karman & Kismet blog shared how she made this one for under $20.
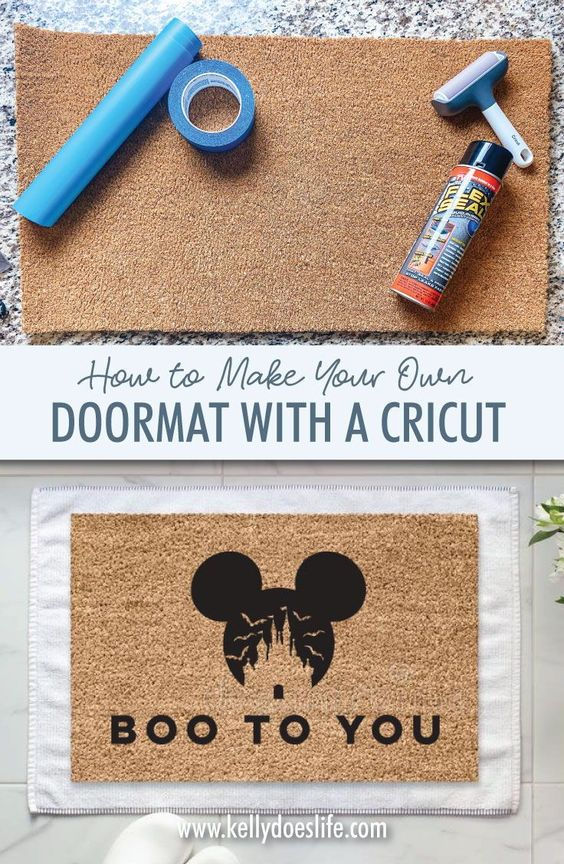
Your fall porch just got so much cuter with this DIY doormat from Kelly Does Life Blog! Super easy to make tons of different design for your mat with a Cricut .
See the full how to on her blog linked below and check out this board for more Disney doormat ideas!

Have you ever wanted to make your own mouse ears? This is the easiest version I have ever made and I promise anyone can do it! Here's how to make your own:
Supplies:
Hot Glue
Fabrics (old tshirts work great! Mine is from Joann Fabrics)
Thin Cardboard (check your recycling!)
Polyfill (or pillow/dog toy fluff)
Notecards
Scissors
Rope, Twine, Ribbon, or Pipe Cleaners
How to:
Take a thin piece of cardboard (mine is from a frozen pizza haha) and trace a cup with has about a 4 inch diameter. Line up your headband to the bottom of the ear and trace the curve so you can easily glue this ear to your headband later. Now cut out your cardboard and repeat this 3 times for a total for 4 half ears.
Next place the cardboard cutouts on your fabric of choice and mark about an inch away all around your cutout. Cut four pieces of fabric this size to cover your ears. Now heat up your glue gun and lightly glue on side of your cardboard carefully. Place a little of polyfill or fluff on top and repeat with all four ears.
Take your little fluffy cardboard ear and place it fluff side down on the inside of your fabric. Carefully hot glue your fabric piece by piece around the back of the ear leaving the bottom curved section open. Repeat with all 4 ears. Next glue the back of your two half ears together lining up the curved sections together. Repeat with second set of cardboard ears.
Look your headband & mark where your ears should be. You can line it up with a pair of ears you already own or measure about 1 inch from the center on either side. Now look at your ears to decide which side will be your front and find where the curved sides are. Glue the back fabric flap of your ears to the cardboard inside to make a flat surface to glue to your headband. Once dry, add a lot of hot glue to that flat surface you made & stick to your headband. Press down & hold until dry. Repeat with other ear. Now take your twine, rope, or pipe cleaners and glue in between the seams of your ears and around the front & back to clean up the edges and add some stability.
Now let’s make your bow! Cut a piece of fabric twice the width of your notecard & about 1/2 inch longer on each side. Repeat again for the second note card. Next take your note card and fold it back and forth as if you are making a fan. Repeat with other note card. Glue your fabric to each crease front & back so your fan is covered in fabric. Glue your two fans together to make one big bow.
Next cut a small piece of fabric about 1 inch by 6 inches to go around the middle of your bow & secure it to the headband. Hot glue the middle of the bow on the top, front, and bottom. Center the fabric on the bow leaving excess in the back to glue to the headband. Lastly, add glue to the bottom of your headband in the center where the bow will go. Stretch your fabric tight and press into the glue & repeat on the top with the other excess fabric. You can also glue the edges of your bow to the ears where they touch.
And that’s it! Now you have homemade mouse ears & can make as many as you want. Watch the tutorial above to craft along with me!
SOOOO which craft are you dying to try?!? I can't wait to see your creations come to life! Don't forget to tag me @tarasimone_fit so I can see your Disney DIYs.
Also, if you have a Halloween Disney DIY you would love featured on this blog just send me an email at tarasimonefit@gmail.com to be added!
Happy Haunting and Boo to YOU!

ps. LOVE Disney and want to more magic in your days?! Every Monday I share pictures from our Disney trips as well as magical tips over on my Instagram! You can also find highlights, reels, and more from our Walt Disney World vacations there as well.


Comments